DIY Guitar Making Videos

Making a Shooting Board

Eric Schaefer Guitars’ Online Guitar Building School


This is a free video from the “Building an OM Acoustic” Course. Click here for more free video tutorials.

Lesson Transcript:
The shooting board is a jig used in conjunction with a handplane to square up stock.
The workpiece rests on the upper shelf against the backstop while a handplane rides along the lower shelf.
A sanding stick can also be used instead of the handplane.
First, the upper shelf is attached to the lower shelf.
Then the backstop is attached to the upper shelf.
And finally, a batten is attached to the underside of the jig so that the jig can be held steady against the workbench.
I also add a toggle clamp for securing the workpiece to the upper shelf.
Okay, now that we understand the basic steps, lets get started:
Okay so now we are going to build ourselves a shooting board. This here is a shooting board. It is a little bit of an extra long shooting board. That’s because a lot of the things that we will be working with; the sides, the neck, tend to be longer pieces.
So, it is a little helpful for an instrument maker to have a shooting board with that extra length.
In total this is 36″ in length.
So let’s take a look at the parts I already have cut up right here for this.
This is the base platform.
I cut this to the dimensions of 14.5″ X 36″.
And then this is going to go right over top.
This is 10″ by 36″.
This is our backstop. 2″ X 10″.
And underneath we are going to have a 2″ X 14.5″batten screwed to the bottom.
It helps you to secure the jig in place when you are using it, so we’ll screw that to there and then when we are using the jig and putting forward pressure on it with out handplane, it’s not going to continue tp push forward and slide on us. This batten on the bottom will help hold it in place.
This is 3/4″ plywood or particle board.
You can use plywood. You can use MDF. MDF is always really great. It holds up really well to changes in humidity and things like that. Particle board works fine though. It is cheap. So we’re going to use that.
Okay, so let’s get started.
The first step is to drill pilot holes for the screws. I am using 1 1/4″ screws. About 2″ from the edge on each side, I make marks for my screw locations and then drill. Each screw is about 6″ apart.
I put a clamp on one end and for the other end, beacuse I don’t have a clamp that reaches back there, I am going to put a weight on it. That is just to hold it in alignment while I drill these holes.
Now I use a countersink bit so that the screws will sit below the surface of the jig.
Apply wood glue and screw in place.
So while that is curing, we can keep working on this. I do want to clean up any squeeze out that comes out along this edge, though.
Okay, next we want to screw down the backstop. That is our 2″ by 10″ piece. I am going to add this nifty toggle clamp but you don’t have to.
I got by for years without this thing, but now I really like having this on the jig so you can clamp down whatever you are working on.
I just want to mark this off; where it’s going to be on our 2″ by 10″ piece, so that I don’t put a screw beneath it where these screws are supposed to go.
Drill 4 pilot holes. Apply glue. And screw in place.
Now I am going to add the batten to the bottom.
Here’s our 2″ by 14.5″.
It is going to be 11″ up from this end.
So let’s measure that out.
Okay, so this is going to go right on that line.
Now we can drill our pilot holes.
I’m not too concerned with where these pilot holes are; just two on this side, two on that side.

Was this useful? I would love to hear your questions or comments! I try to answer every e-mail I receive, so please be patient with me :) eric@ericschaeferguitars.com

Want more of this? Subscribe below for Weekly Guitar Making Tips on “The Small Shop Luthier Blog”


Want to learn more? Take a class with Eric Schaefer and build your own guitar in 8 days

ES BACKGROUND


Making a Guitar Mold

Eric Schaefer Guitars’ Online Guitar Building School


This is a free video from the “Building an OM Acoustic” Course. Click here for more free video tutorials.

Lesson Transcript:
For this course, we are going to use an outside guitar mold. The mold is used during the side bending process and the soundbox assembly process. It also helps you mark out important dimensions in the early stages of the build.
First, we will make a template.
Then we will trace the template onto 3/4″ MDF, plywood, or particle board and cut 6 sections.
each section is then atteched to the original template for refinement on the router table.
The 6 sections are glued together to create 2 pieces.
Hardware is installed to hold the two pieces together and a wooden dowel is installed at the joints to keep the pieces properly aligned.
For my template I am using half of a spare OM mold that I had in my shop, but you will have to create your own template from scratch, using your plans as a guide. To do this, trace half of your guitar’s outline onto tracing paper.
Stick the tracing paper to 3/4″ particle board, MDF, or plywood with spray contact adhesive.
Cut on the line with a bandsaw.
I use a 1/4″ blade or smaller so that it can handle the curves.
Take your time and strive for consistent curves. All major inconsistencies can be smoothed out with 80 grit sandpaper wrapped around a wooden dowel. Minor inconsistencies can be ignored.
As far as precision goes, the inside cut is what really counts. The outside cut can be rough cut to any shape as long as it is about 3 to 5 inches from the inside cut.
Finally, drill 3 holes for use in mounting the template.
Now this is actually just another piece from another mold that I have.
I’m re-purposing it as a template for other molds.
So, with that in mind, yours does not need to be as bulky as this is.
In fact, you could just use a single piece of 3/4″ plywood or something even thinner (half inch plywood would work just fine).
That way, you could carefully, on a bandsaw, cut out the shape as precisely as you can. Because once you cut out that shape we are going to use that first template that you make, that should look something like this, to make the other pieces.
There is going to be 6 pieces overall, 3 stacked on top of each other as you can see here. Having that template makes it real easy. We can make exact copies of each piece using the router with a guide bearing bit.
So now we have our particle board out on the floor. And I’m going to use this template that I made here and trace out 6 copies of this.
So instead of taking this straight to the bandsaw, because it is so big and cumbersome, we’re going to first see if we can cut this up a little bit in place here using a jigsaw. You can use a circular saw. If you have a friend with you, you can take it over to the bandsaw, or the table saw.
I am just going to break it down first this way into some slightly smaller pieces and then we can cut it on the bandsaw.
Okay, now these are small enough to fit in the bandsaw.
So we want to stay about 1/16″ outside this line.
That way, when we take this over to the router table, we will have very little wood left over for that router bit to remove.
So we’ll stay nice and tight to the line.
Okay so now we are going to attach our template to the first piece, so that we can clean up those edges on the router table.
So what I’m going to do is I’m going to hang this over the end like that, and line this up, so that the bottom piece is overhanging just slightly, everywhere.
Okay, both sides are clamped. Let me just look around the edge and make sure we are overhanging a little bit.
And I didn’t drill any pilot holes. If you are using particle board or MDF you don’t need to drill pilot holes.
We can just drive those screws through and it won’t split.
So we are going to use a 1/2″ straight cut bit with a guide bearing. That is what this little wheel is right here.
And so I already have that set up in a good place. The guide bearing is up here against the template.
Now remove the template, attach it to the next section, and continue routing until all 6 sections are complete.
Okay so we’ve cut 6 of these. I’m going to pull 3 over to make our first half of our mold. We’re going to hang this over the edge a little bit.
What I first want to do, is very carefully take my time and get this lined up so that all the pieces are flush with each other.
And I could check that with a square or something but I’m not going to. I can just feel for any overhanging edges. That is pretty good there.
I carefully clamp this up, making sure it doesn’t move. The whole purpose of this is that we are going to drill 2 holes here so we can have locating screws there to keep everything in alignment when we glue all these pieces together.
Otherwise, if we put the glue on there without the locating screws, the whole thing will slide around in the glue once we tried to clamp it down. So this will help us maintain alignment.
No need to measure this out.
So then these 2 screws will go in here. We’re not going to put them in there just yet. So now we can take this apart and we can spread the glue.
I let the glue cure overnight, and now we are ready to remove the clamps and attach the hardware.
Okay, we have the two pieces. Now let’s just add our hardware to it.
The first thing I want to do is mark the holes for this and drill. So I want to set this up for a little more than 1/4″ from this edge here. The reason why I am not super precise is because this handle here is adjustable. Once we get this on, you can always adjust the tension of this arm.
Let’s mark the other piece, which faces this way.
Okay, let’s drill that.
We have the correct size bit for the screws and I put a little flag on there as a depth stop so I drill only as far as I need to drill.
Okay, now we are going to drill for the dowel, which will keep this alignment correct, as far as side to side.
You see that? If we don’t put the dowel in there, it can pull apart like that. So we put the dowel in there to keep it together.
I’m going to clamp it in place at the edge of my workbench.
I’m using a 1/2″ dowel, but really you can use any size dowel, as long as the bit you use matches the size of the dowel.
And this does.
I’m using a forstner bit because it leaves a flat bottom.
I’m just going to rest the brad point right on that line that separates the two pieces.
I’m going to set the depth of the bit. We don’t want to go all the way through.
I’m just going to go down most of the way. I’m going to go halfway through the third sheet of particle board.
So I put a tape flag on here to mark where that will be.
Okay, let’s do the other side.
Press that all the way down to the bottom and I’m just going to mark this off, and cut that real quick on the bandsaw.
Okay, and to glue this in place, very simple, I’m just going to run a bead of glue down the edge like that. Press it in place. Place some wax paper over, so we don’t glue the whole thing stuck together.
And to clamp we can just close that up, just like that.
Okay, let that glue cure for about an hour and you’re good to go!

Was this useful? I would love to hear your questions or comments! I try to answer every e-mail I receive, so please be patient with me :) eric@ericschaeferguitars.com

Want more of this? Subscribe below for Weekly Guitar Making Tips on “The Small Shop Luthier Blog”


Want to learn more? Take a class with Eric Schaefer and build your own guitar in 8 days

ES BACKGROUND


Jointing the Plates

Eric Schaefer Guitars’ Online Guitar Building School


This is a free video from the “Building an OM Acoustic” Course. Click here for more free video tutorials.

Was this useful? I would love to hear your questions or comments! I try to answer every e-mail I receive, so please be patient with me :) eric@ericschaeferguitars.com

Want more of this? Subscribe below for Weekly Guitar Making Tips on “The Small Shop Luthier Blog”


Want to learn more? Take a class with Eric Schaefer and build your own guitar in 8 days

ES BACKGROUND


Building a Steel String Acoustic Guitar: An Overview

IMG_20150530_161021

*This is an inside look at The May 2015 Acoustic Guitar Workshop at Eric Schaefer Guitars. The class is an 8 day intensive course in Guitar Making with a maximum of only 2 students to a class. For more information on the courses go to Guitar Making Classes.

In May of 2015 Chris (left) and Jim(right) built their own OM size acoustic steel string guitars with no prior experience, in just 8 days. The following is a walk-through of the steps they took.

Day 1…

Jim and Chris lay out the bracing pattern and mark the X-braces in preparation for notching. The X-braces must each be notched at their point of intersection to accept both braces and still allow for proper mating with the soundboard surface.

IMG_20150523_090937

Once the area is marked out for notching, the notch is cut by cutting kerfs about 1/16″ apart, removing the kerfed material with a chisel and finally cleaning up the notch with a file.

IMG_20150523_092926

The intended radius for the top is transcribed onto the side of the X-braces. The idea is to put a radius into the mating surface of the braces. That way the top will be forced to conform to the radius. A block plane removes the bulk of the material on the braces and then the fine-tuning happens on a radiused dish covered in sandpaper. The same radius is applied to the tone bars.

IMG_20150613_102616

The X-braces are glued first. The radius dish is used as a bearing surface for the glue job.

IMG_20150613_120858

While the glue sets for the X-braces Jim begins preparing the neck block and end block for assembly to the sides. The sides are placed in a mold with interior mold clamps. Jim is marking the centers on both blocks in order to properly align them.

IMG_20150523_110917

The neck and end blocks are glued to the sides in alignment with the form’s centerline. A carefully planned assemblage of cauls, C-clamps and cam camps are used to ensure good distribution of pressure. Since the lower bout of this mold has a continuous curve, the mating surface of the end block was radiused to fit the mold prior to glue up.

On the left, the neck is prepared for routing of the truss rod channel.

IMG_20150718_143444

Chris has shaped the bridge plate and is gluing it in place using a caul to allow clearance for the clamps over the x-braces. Notice how the clamps are all pulling in the direction of the x-brace. This is so the x-brace can act as a fence to keep the bridge plate from “swimming” off its mark.

IMG_20150523_121329

Jim begins carving the taper into the x-brace ends. Ultimately, the x-brace ends will be tucked into the kerfing of the sides for continuity of structural support across the top and for transmission of tone out to the rims of the instrument.

IMG_20150523_143219

Chris prepares the tone bars and the finger braces. The ends of the braces have been angled to butt up seamlessly against the x-brace arms and he is marking the areas where the taper will begin. Unlike the x-braces, the tone bars and the finger braces will taper in both directions leaving a plateau in the middle.

IMG_20150523_161501

The end of the brace that tapers in toward the x-brace is easier to carve before it is glued in place, so Jim and Chris stick the braces to a piece of scrap wood with double stick tape and carve the inside taper.

IMG_20150523_163039

The braces are then glued in place.

IMG_20150523_170834

The upper transverse bar and the fretboard graft are also glued in place at this time. Later the upper transverse bar will also be carved to a taper so that the brace ends tuck into the kerfing.

IMG_20150523_172349

In the meantime, Jim moves on to the back plate. He aligns the backstrip with the jointed centerline of the back. Using a straightedge as a fence, he glues the backstrip in place, again mitigating the “swimming” problem by allowing the cam clamps to pull in the direction of the fence.

IMG_20150524_092040

Of course, you can never use too many clamps!

IMG_20150524_103202

Jim gets to work carving the rest of the soundboard braces.

IMG_20150524_100748

Unlike the x-braces, the tone bars and finger braces will not tuck into the kerfing on the sides. Rather, these braces will be “feathered” into the soundboard. This means that the ends of the braces will be carved down to nothing. If executed well, the feathered braces will appear to simply flow into the plane of the soundboard.

IMG_20150524_105958

Jim takes a break from carving braces to round over and smooth the backstrip using a block plane and sandpaper.

IMG_20150524_105937

Meanwhile, Chris is gluing the soundhole braces after shaping them to fit. The soundhole braces connect the x-braces to the upper transverse bar. They also reinforce the area around the soundhole.

IMG_20150524_123249

The back braces can be glued all at once using cauls to distribute pressure.

IMG_20150524_130211

Chris drills a hole in the center of the upper transverse bar so that the truss rod can be accessed later with an allen wrench through the soundhole.

IMG_20150524_170016

Using a round file, the hole is further slotted in the direction of the soundboard. At the same time, the fretboard graft is being relieved by the file so as not to impede truss rod adjustments later on. The blue tape under the file is there to remind Chris to stop before accidentally filing into the soundboard.

Chris also glued a thin shaving of spruce at the x-brace intersection to hide the seam there. The blue tape is “clamping” the spruce shaving in place while the glue sets.

IMG_20150524_170025

Chris and Jim taking a break to show off their work and get some fresh air!

IMG_20150524_171741

The top and back bracing are further refined by scraping with scrapers and smoothing with sandpaper to 220 grit

IMG_20150525_094225

IMG_20150525_094236

IMG_20150525_152517

Ah, decisions… decisions! Jim and Chris pick through a pile of exotic, figured and unfigured woods to determine the best fit for the strictly aesthetic appointments on their guitars: headplate, heelcap, and endwedge.

IMG_20150525_110304

While there are no hard and fast rules for artistic discernment, it is a safe bet to choose something that contrasts with the neck, back and sides. Keep in mind that certain woods, particular those with a bright reddish color, will darken or dull in time.

IMG_20150525_110311

Jim and Chris begin work on the endwedge. The purpose of the endwedge is to cover up the seam where the sides meet on the endblock. First the endwedge is cut to shape and aligned with the center of the endblock. The outline of the endwedge is traced onto the sides. Note: The seam where the sides meet is not a reliable measure of the guitars true center.

Jim and Chris use a 10″ dovetail saw to cut down to the endblock on the two tapered lines. Cam clamps hold a small block with a straight edge on the outline as a guide for the saw.

IMG_20150525_115741

IMG_20150525_115755

Chris makes multiple kerfs with the dovetail saw to the inside of his first two kerfs. Then he pops out small chunks of wood by wedging a chisel along the grain lines which are perpendicular to the kerf cuts.

IMG_20150525_123753

Jim follows up his chisel work with a dremel tool to clean up what was missed by the chisel. A sturdy base and a fine downcut bit help ensure a smooth, clean pocket.

IMG_20150525_131511

Jim glues his endwedge in the pocket simply by applying titebond to the endwedge, lightly clamping with 2 spring clamps and then tapping the wedge lightly into place with a hammer and a hard block. After leveling with a random orbit sander, his endwedge looks like this:

IMG_20150525_163435

Chris has installed his endwedge and leveled it flush with the sides.  He is lightly brushing ebony dust into any gaps between the endwedge and the sides. Dropping a bead of water-thin superglue along the ebony-dust-fills and cleaning up with sandpaper will hide the gaps.

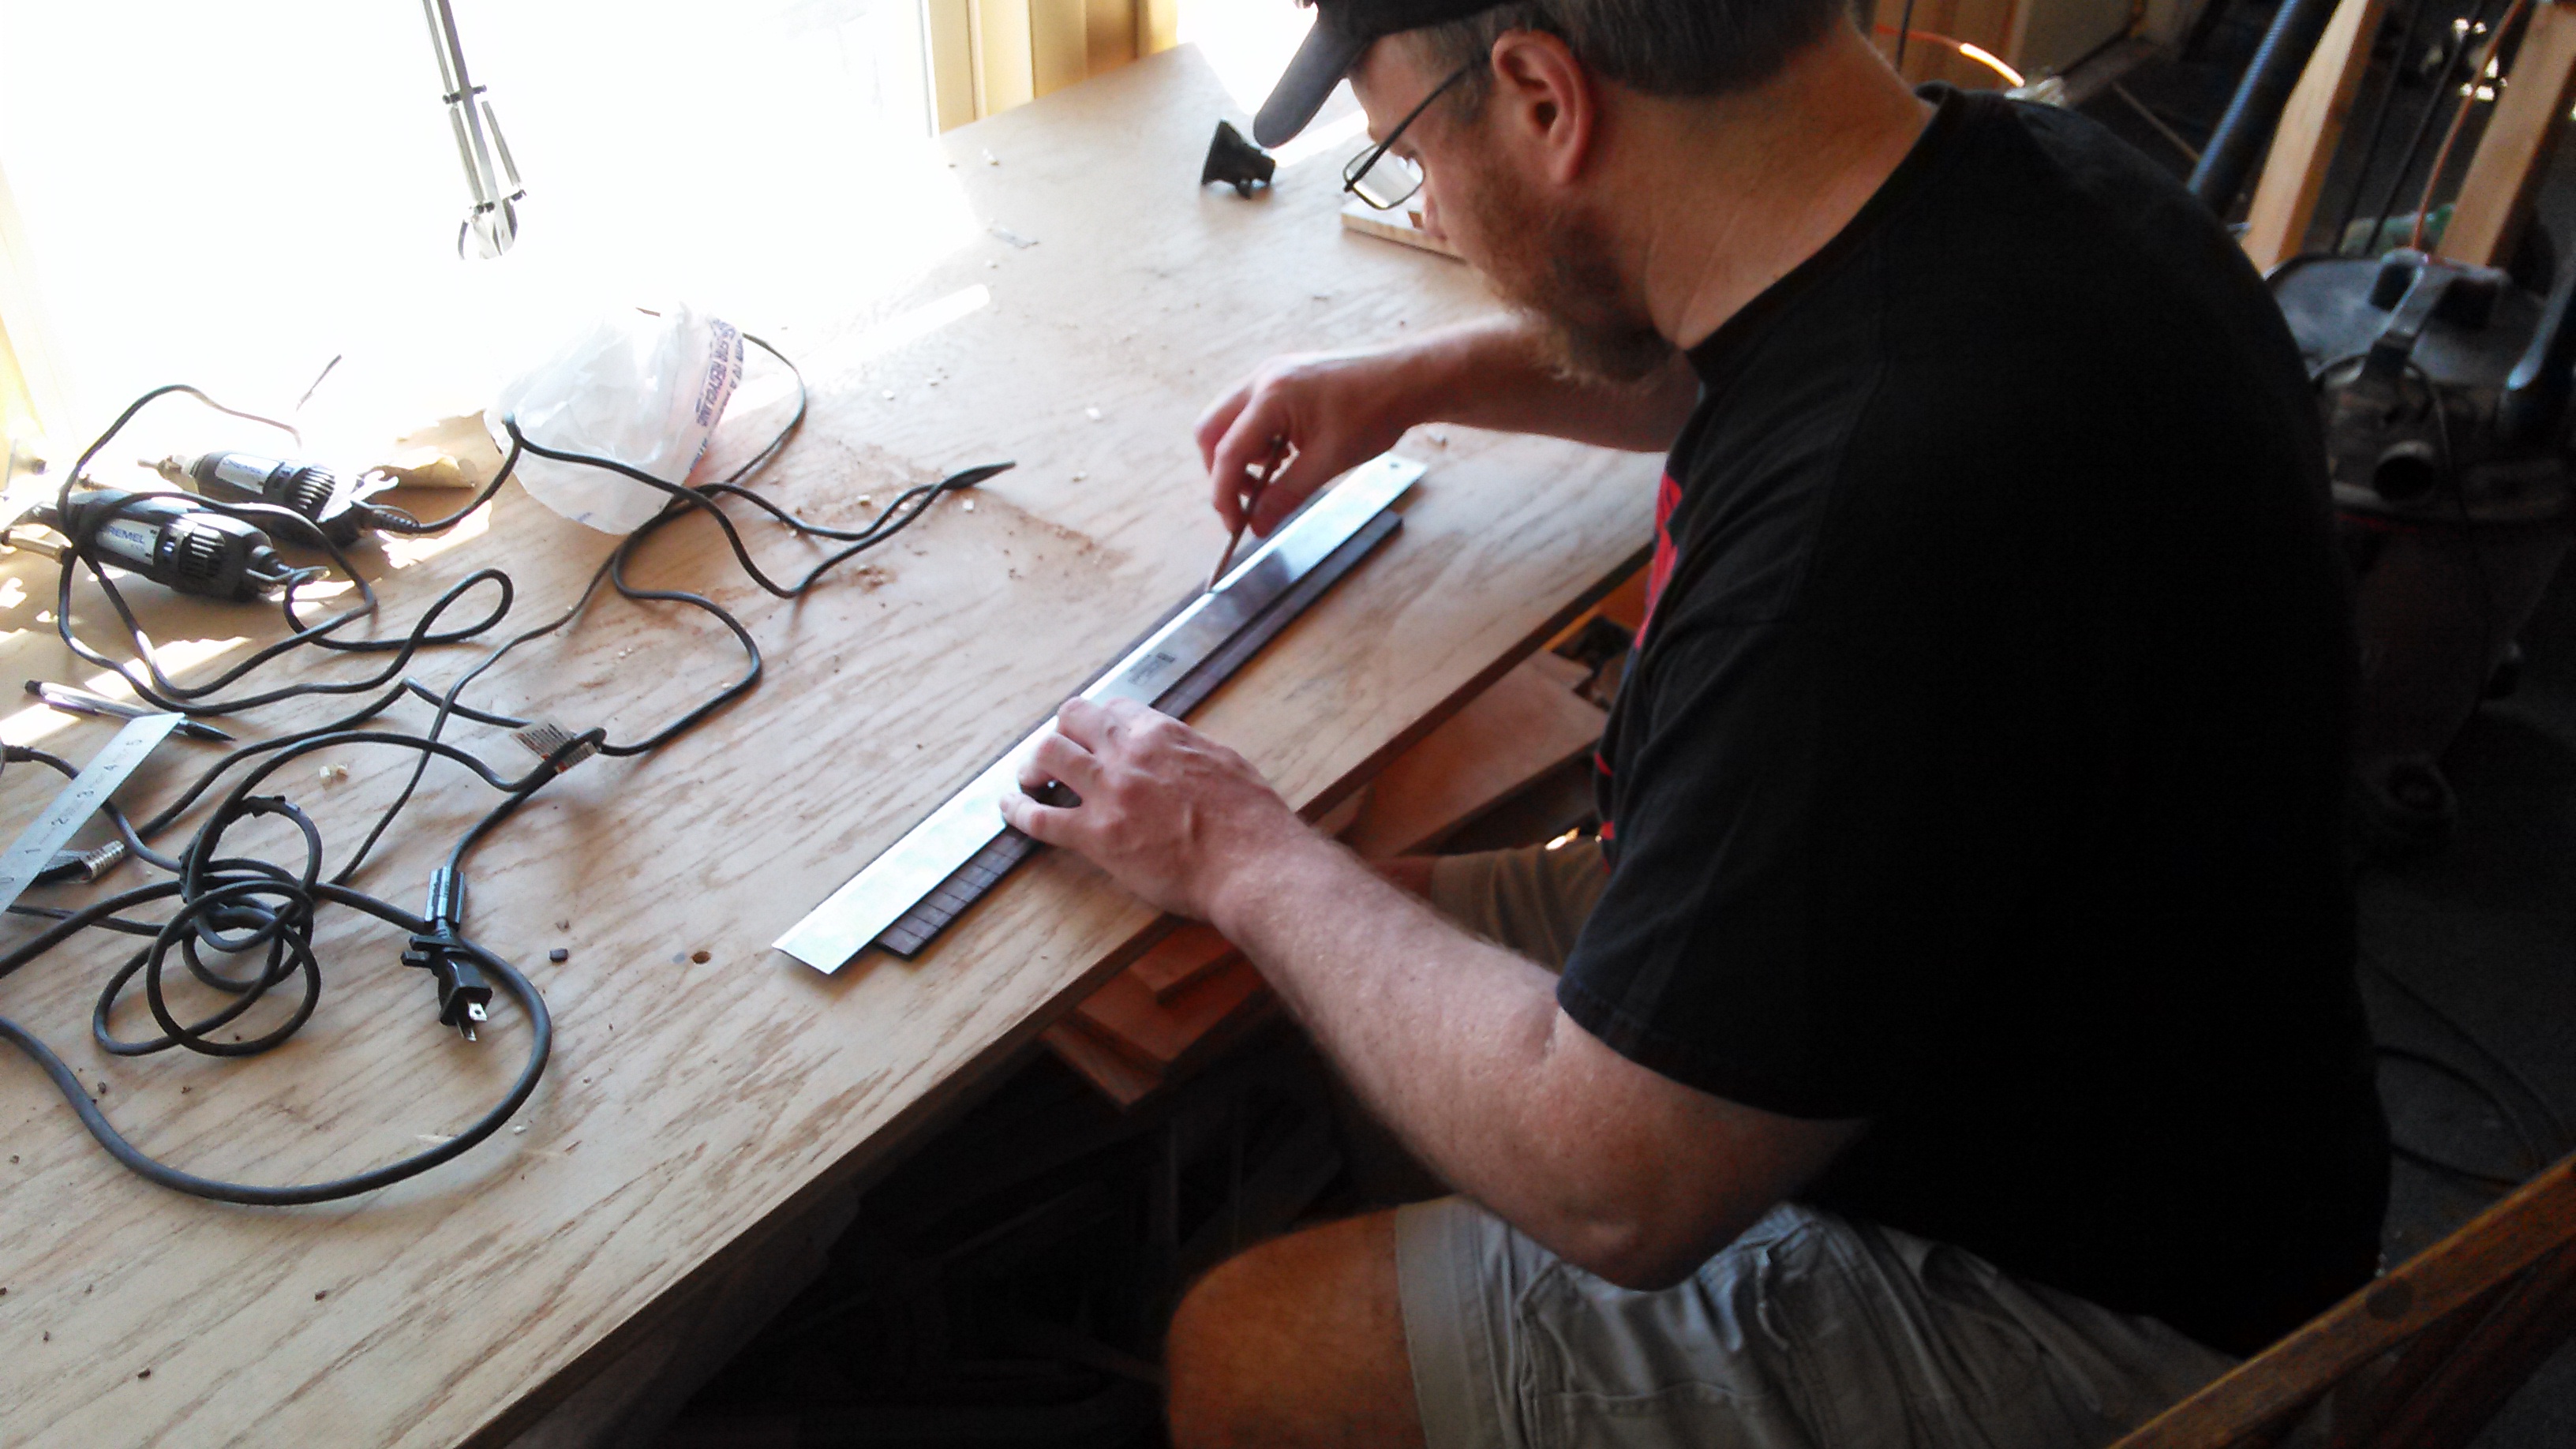
In the background, Jim has begun work on the fretboard. He is trueing up the edge of a rosewood board on a shooting board with a #5 jack plane.

IMG_20150525_145406

Chris begins work on his fretboard by first thicknessing it on the drum sander.

IMG_20150525_132442

After trueing up one edge of the board, Chris begins slotting the fretboard. The board is fastened with double stick tape to a metal fret slot template for a 25.34″ scale length. A specialty table saw blade with a 0.023″ kerf is used to match the frets tang. The fence has an index pin which accepts the index notches of the fret slot template. The depth of cut is set to be greater than the depth of the fret tang by a small amount to take into account future levelling of the fretboard prior to installing the frets.

IMG_20150525_164914

Jim has slotted his fretboard and is now tracing the taper of the fretboard. Steel string fretboards are narrower at the nut and wider towards the soundhole end. Jim sets the taper by first finding center at the nut and center at the 14th fret (or the location where the neck meets the body). He then marks out the width at the nut and the width at the 14th fret and connects his marks with a straightedge.

IMG_20150526_100136

Chris and Jim cut just outside the line and then plane down to the taper on a shooting board with a jack plane.

IMG_20150526_102025Chris double stick tapes his fretboard to the workbench and begins sanding with a radiused block and 80 grit sandpaper. The block is radiused to 14″. It is important to be mindful of any tipping or tilting of the block while sanding. Covering the fretboard surface in chalk first will reveal any discrepancies in your sanding form, and help you determine where your high and low spots are.

IMG_20150526_111451

Jim, on the other hand, puts away the fretboard for now and resumes work on the sides. The sides are proud of the neck block and end block and they need to be brought down level with the blocks. First, Jim removes just enough side material to be able to rest a straightedge across both blocks. This can be done quickly with a chisel as long as you only chisel in the area above the blocks and you chisel in TOWARDS the side seam. This is VERY important! If you use the chisel in the other direction you will catch the grain and split the sides far down its length, likely ruining your entire side.

IMG_20150823_094109

Now with the straightedge resting across both blocks as a visual aid, Jim begins to plane the rest of the side material. A block plane or a spokeshave makes quick work of it. The goal is to bring the sides down flush with the blocks without reducing them lower than the blocks. For this reason, Jim stops short of flush so that the final 1/32″ or so can be achieved on the sanding dish. It is important to note that the end block is taller than the neck block so more material is being removed from the neck block end of the guitar. This sets the front to back contour of the sides.

IMG_20150526_111512

Chris begins fretting his fretboard. First the fretwire is degreased with naphtha and bent to a radius greater than the radius of the fretboard (greater than 14″). This is to facilitate seating of the frets on the ends. Each fret is cut to be slightly oversized for its slot. The excess will be nipped off later. A brass headed dead-blow hammer is used to prevent recoil. A hard granite block is placed under the fretboard, also to prevent recoil.

For each fret, first the ends are tapped in, each with a single, sharp blow from the hammer. Then a series of sharp blows, starting from the middle and working out towards the end, seats the rest of the fret. Keeping a loose grip on the hammer, much like a drummer’s grip on drum sticks, is good technique.

IMG_20150526_152927

Meanwhile, Jim has brought the sides down flush with the blocks by sanding the last little bit on the radius dish. He is using a 40′ radius for the top and a 15′ radius for the back. He is now gluing the kerfing to the sides. It is easier to glue small strips of kerfing than it is to glue one long, continuous piece. The kerfing is clamped in place with clothespins. Each clothespin is wrapped with a rubber band for added clamping force. The kerfing is glued just a hair proud of the sides so that it can be radiused later on the radius dish.

IMG_20150526_153124

IMG_20150526_154625

IMG_20150526_160922

Chris has fretted the entire board and now he is clamping a specialty caul to help seat any fret ends that may be poorly seated. The specialty caul is nothing more than a reject factory fretboard with brass rods epoxied to the edges. The brass is soft and doesn’t mar the frets when clamped.

IMG_20150526_154637

With the caul clamped so that the brass rods seat the fret ends, Chris runs a bead of water-thin CA glue down the tang of each fret.

IMG_20150526_155405

Chris now begins to catch up with Jim on the sides. In the picture below he is using the radius dish to prepare the sides for kerfing. The mold clamps hold the sides in place and keep them from splitting due to the sanding action.

IMG_20150526_173932

Jim is checking the depth of his fret slots. It is critical that the slots are deeper than the fret tang. Otherwise the frets won’t seat properly.

IMG_20150527_103812

To deepen the slots, he uses a special dovetail saw with a very precise 0.023″ kerf because it is also critical that you do not widen the slot in the process of deepening it.

IMG_20150527_103756

Chris has turned his attention to the back plate. The brace ends are tapered to tuck into the kerfing just as the x-braces and upper transverse bar were. Now Chris is trimming the brace ends so that they tuck into the kerfing but not through the sides. He uses a small razor saw and a chisel.

IMG_20150527_125427

Similarly, Jim has marked where the neck and end blocks overlap the backstrip and he is trimming the backstrip to fit. He also uses a razor saw and a chisel. The razor saw kerfs the material and the wedging action of the chisel pops out the material between the kerfs.

IMG_20150527_125437

Jim and Chris have filed the fret ends flush with the fretboard using a flat single-cut file on a shooting board. They have also beveled the fret ends with the file and they are now using a specialty needle file to smooth over and take the sharp bite out of the fret ends so they will feel good on their playing hand.

IMG_20150527_140921

IMG_20150527_165931

Now they place the sides back in the mold. They have marked where the back braces meet the kerfing and notched out those areas using a dremel tool with a base. They are now radius sanding the kerfing to match the intended radius of the top and the back plates: Jim is using a 40′ radius for the top and a 15′ radius for the back, while Chris is using a 28′ radius for the top and a 20′ radius for the back.

IMG_20150527_143304

With the kerfing notched and radiused, the back is now ready to be glued to the sides. The sides are kept in the mold in order to keep its shape. The radius dish for the soundboard side is used as a bearing surface.

To start, the radius dish is elevated with 3 scrap blocks underneath. This way clamps can easily and quickly  slide into place. Special care is taken to apply the clamp force of each clamp down only on the kerfing and the blocks, and not inward where you can easily crack the plate.

It is best to leave this clamped overnight.

IMG_20150527_145509

The next morning Jim and Chris prepare to close the box. The jointed centerline of the soundboard and the center of the neck and end blocks are carefully aligned and lightly clamped in place. Jim and Chris mark where the x-braces  and upper transverse bar meet the kerfing.

IMG_20150528_093806

Chris and Jim are trimming the excess off the upper transverse bar and the x-braces.

IMG_20150528_095842

Chris notches out the kerfing to fit the x-brace arms and the upper transverse bar.

IMG_20150528_101630

The soundboard is aligned, glued and clamped in much the same way as the back plate.

IMG_20150528_112956

Of coures, a class would not be complete without an emergency trip to Lowe’s to replace a router bit gone M.I.A.

IMG_20150528_132508

After lunch and Lowes, Jim marks out the spacing for his nut, the scale length and the neck tenon.

IMG_20150528_143103

Chris uses a laminate trim router with a guide bearing to trim the excess overhang of the top and back plates. The guide bearing runs along the sides and ensures a flush cut. It is important to be aware of the direction you are running the bit. The bit should always be cutting down across the grain rather than up against the grain. If the bit runs up against the grain, the cutter can snag a grain line and tear out a large chunk. This is especially prominent in the waist area of the guitar. The solution is simply to run the router in the opposite direction so that the router is always moving “downhill.”

IMG_20150528_160922

The top and back plates are now flush with the sides. Chris checks the area of the neck block where the heel of the neck will bear for square. He uses a hard, flat block and 80 grit sandpaper to make this area square to the soundboard surface.

IMG_20150528_172550

Meanwhile, Jim has glued an oversized 1/8″ thick piece of Imbuia to his neckblank. This will be the headplate.  A large, padded caul and many clamps are needed to evenly distribute the pressure. Drilling holes for locating pins (finishing nails with the heads trimmed off)  help to keep the plate from swimming off its mark. Jim drills the holes for the locating pins in the areas of the headstock that will be removed later.

IMG_20150528_173926

The soundboxes are complete!

IMG_20150528_185553

IMG_20150528_185627

Chris has stuck a wood template for the headstock shape to his neckblank using lots of doublestick tape. He is again using the laminate trim router and a guide bearing to rout out the shape. The guide bearing runs along the edge of the template. Before touching the neckblank with the router, however, Chris cleared as much wood as he could freehand on the bandsaw. The router bit simply cleared out the last remaining 1/32″ or so. You don’t want the bit to have to bite off more than it can chew.

IMG_20150529_105220

Chris removes the template carefully by heating a metal spatula with a heatgun and separating the template from the neckblank. He then places the template on the show-face of the headstock and marks out the tuner holes by pressing a center-punch through the template holes.

The holes are then drilled on a drill press at a high RPM with a forstner bit and a scrap block underneath to prevent tear-out.

IMG_20150529_112653

Chris and Jim align the center of the fretboard’s width at the nut with the center of the headstock. They also align the center of the fretboard’s width at the 14th fret with the center of the heel. Spring clamps hold the fretboard in place while they trace the outline of the fretboard onto the neckblank.

The excess material of the neckblank is then removed on the bandsaw to within 1/8″ of the outline.

IMG_20150529_123536

At this point it is really starting to look like a guitar! There is still a lot of work to do, but Jim and Chris have earned a moment to admire their work and reflect upon what they’ve done. Keep in mind that the fretboard, neck, bridge, and body at this point are not glued in place. The heavy work of neck carving is about to begin!

IMG_20150529_130333

Chris saws the excess fretboard length off at the 23rd fret slot.

IMG_20150529_162448

Chris and Jim begin preparing both their neckblanks and guitar bodies for the mortise and tenon jig. The neck block area of the body must be square to the soundboard surface. The body is then placed in the mortise jig. The mortise is cut using a template and a plunge router with a guide bearing. The tenon jig is then set to cut the tenon at an angle that allows for optimal action adjustments later on. The tenon is also cut with a template and a plunge router with a guide bearing.

IMG_20150529_170326

After the mortise and tenon are cut, Chris checks the fretboard again for alignment.  2 small holes are drilled at the 12th fret space precisely where the fret position markers will be. 2 locating pins help align the fretboard during glue-up. Chris glues the fretboard to the neckblank at this time, but not yet to the soundboard. The truss rod is placed in the truss rod channel with a dab of epoxy prior to gluing the fretboard down. The threaded adjustment end of the truss rod should be protruding from the tenon.

IMG_20150529_185442

Jim has also glued the fretboard to the neckblank. He has now marked out the curve of the heel and is making relief cuts on the bandsaw before cutting along the curved line.

IMG_20150530_094302

Chris marks out the width and length of the truss rod protrusion onto the soundboard. He uses a dremel tool to open the area for the truss rod protrusion.

IMG_20150530_101936

Neck carving begins! The carving process is easy when you approach it by shifting focus between 3 distinct “sections” of the neck: The heel, the shaft, and the headstock. Once these areas are roughed out, it is simply a matter of blending the transition areas between headstock and shaft, and between shaft and heel. The headstock shape is already roughed out at this point, so that leaves the heel and the shaft as the primary focal points.

Chris and Jim begin by using a rasp to dig a “trough” at 2 points along the shaft: one near the heel and one near the nut end. The neck will taper in thickness from the nut to the heel, so they dig a slightly deeper “trough” at the nut end. A difference of 2 millimeters is pretty standard. They monitor their progress with a digital caliper.

IMG_20150530_103856

IMG_20150530_112631

Jim shifts his focus to the heel. He is chiseling the surrounding wood flush with the heel cap. After which he will bring the heel flush with the fretboard. The objective then is to remove the material between the fretboard and heelcap until a straightedge sits flat on the heel. The fretboard and the heelcap can be considered the hard points around which the rest of the neck is formed. It is therefore important not to inadvertently change the shape of the fretboard or heelcap at this point.

IMG_20150530_112555

IMG_20150530_115542

IMG_20150530_125615

Chris also begins to shape the heel.

IMG_20150530_120842IMG_20150530_123306

IMG_20150530_125642

Jim shifts his focus to the neckshaft. He puts his neck up in a vise with the fretboard face down. He sets up a spokeshave for a coarse cut and starts removing material first from the edges. The objective is to reduce the thickness of the neckshaft to the level of the 2 “troughs” that Jim dug out with the rasp. At the same time Jim will be contouring the neck profile, stopping frequently to check his progress. A straightedge will tell you if you are digging too deep in the middle, a common problem when carving with a spokeshave.

IMG_20150530_154655

IMG_20150530_154702

IMG_20150530_161021

80 grit sandpaper held taut against the neckshaft cleans up the coarse marks from the spokeshave and levels the high spots. Chalking or marking the neck with pencil prior to sanding will help you spot high spots and monitor progress.

IMG_20150530_172626

Chris has roughly contoured the neckshaft and his attention is now turned to blending the transitional area between the headstock and neckshaft.

IMG_20150530_155434

IMG_20150530_161411

IMG_20150530_171731

Chris begins blending the transitional area between the heel and the neckshaft. He uses a combination of spokeshave, rasp, files, sandpaper and scrapers

IMG_20150530_174427

IMG_20150530_181303

IMG_20150530_185230

IMG_20150530_193350

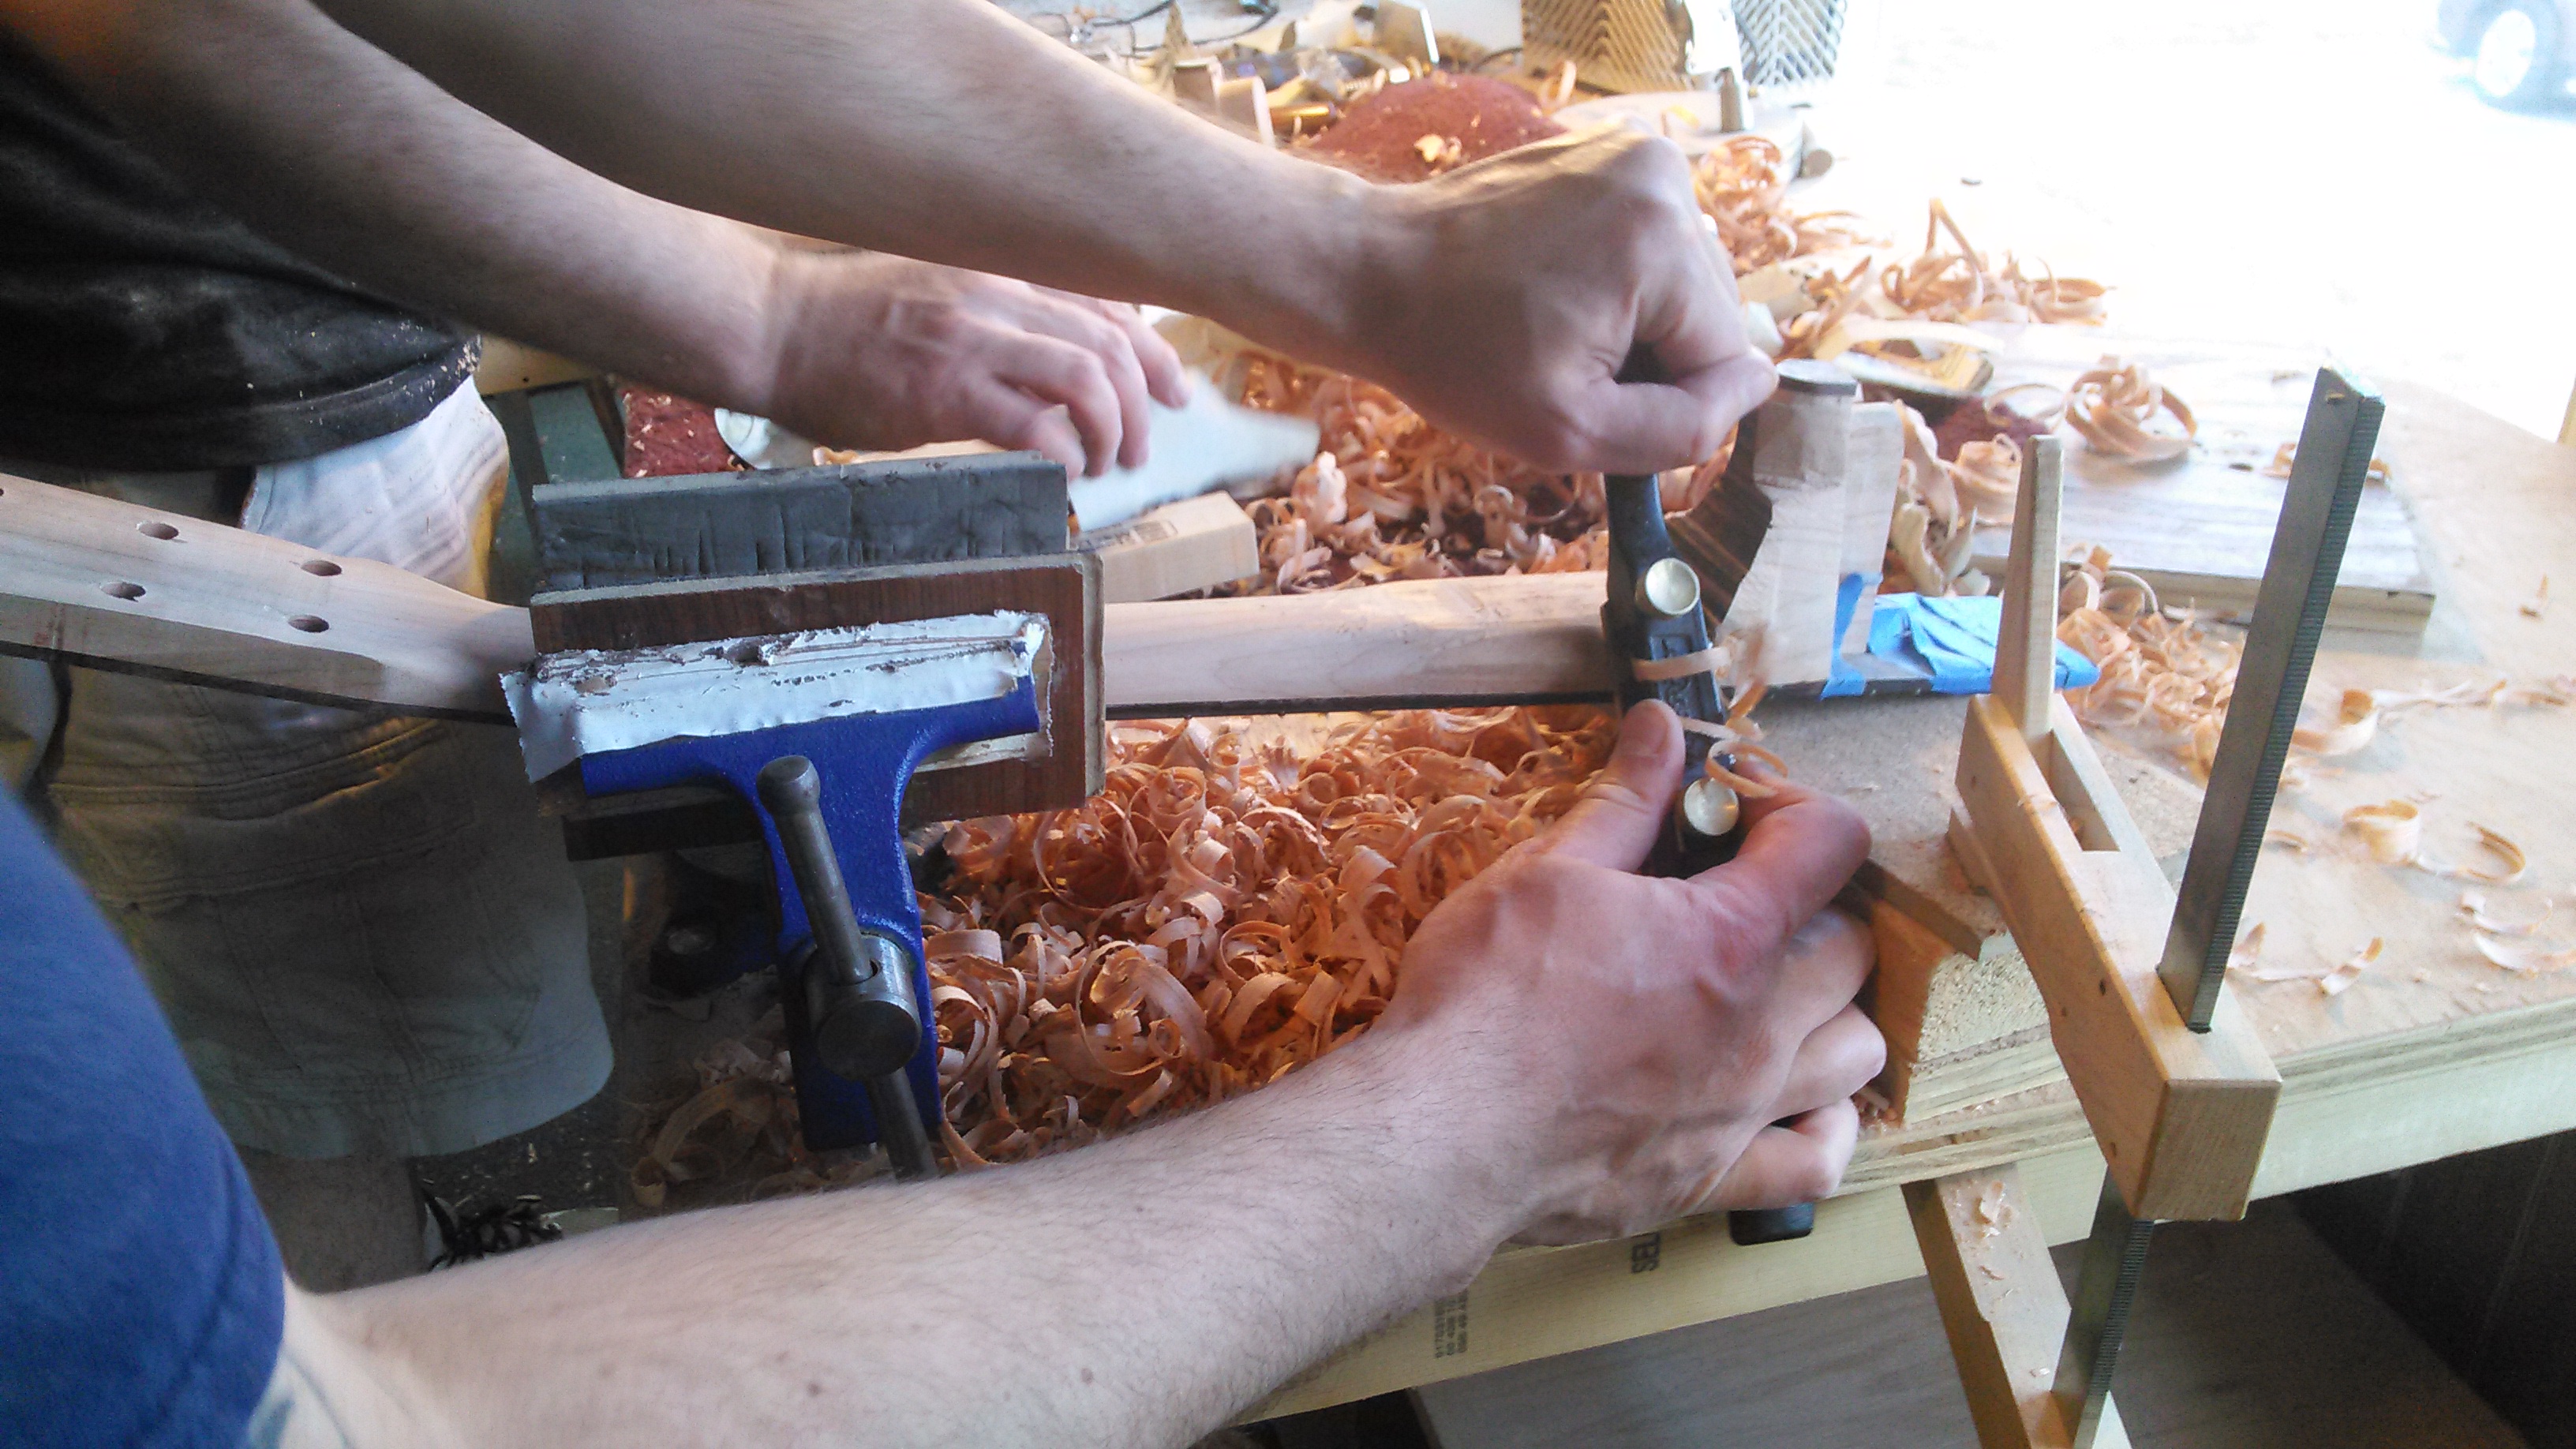
The neck is complete after a long day of carving! Chris places his neck into the mortise of the body to admire his work. He checks the neck fit. The bridge is taped in place so that the alignment of the neck can be set to the location of the bridge.

IMG_20150530_210403

Jim’s neck needs some adjustment to bring it into alignment with the center line of the body and the bridge. A small amount of material is removed from the shoulder of the tenon on one side

IMG_20150530_222510

IMG_20150530_222857

The neck can now be bolted and the fretboard tongue glued onto the soundboard. There is no glue in the mortise and tenon joint. The bolt on neck is intended for easy removal in the case of future neck repair. Should you have to remove the neck, all you need to do is heat the fretboard tongue to soften the glue and remove the two neck-joint bolts.

IMG_20150530_221843

The bridge is the most critical glue job of the entire build. The bridge bottom is first radiused to match the radius of the soundboard. This is done simply by sticking sandpaper to the soundboard surface and sanding the bridge to match. The location of the bridge is double-checked to make sure that the location where the saddle slot will be routed is precisely where the scale length ends (distance from the leading edge of the nut to the 12th fret times 2 plus a small amount for compensation). There is a little wiggle room for error because they have not routed the saddle slot yet. The saddle slot will be routed after the bridge is glued to the body.

The bridge pin holes are drilled and bolts are used to locate the bridge and keep it from swimming off its mark when it is glued. The bolts provide a small amount of clamp force, but Chris adds 3 cam clamps for necessary pressure. The bridge should be clamped overnight.

IMG_20150531_085846

The 2 clamps on the wings of the bridge are not ideal because they are putting pressure on the back plate and top. If Chris pulls the cam too far on those clamps he can easily crack the top and back plate! A better way to clamp the wings is through the soundhole with 2 “Ibex” bridge clamps. It should look like this:

IMG_20151020_085720[1]

Chris thicknesses the headplate so that the tuning key posts sit at an appropriate height.

IMG_20150531_103037

Chris and Jim sand a piece of hard bone to fit into the nut slot.

IMG_20150531_105447

IMG_20150531_105457

As mentioned previously, the saddle slot is routed after the bridge is glued. This is to ensure optimal intonation. The jig is the StewMac saddle routing jig. The saddle slot is slanted as it is on all steel string guitars to compensate for the difference in thickness of the bass strings in comparison to the treble.

IMG_20150725_113545

Jim uses a 3 degree reamer to fit the bridge pins. The objective is to get all of the bridge pins to seat snugly and at equal heights to each other.

IMG_20150531_140139

Chris begins filing string ramps into each bridge pin hole. Each string must be test fit into the pin hole to determine if the ball end of the string seats against the bridge plate. A small LED light and an automotive inspection mirror are used to inspect the inside of the guitar. If the ball end sits up off the bridge plate, then the string ramp needs to be filed deeper to allow more room for the string.

IMG_20150531_124802

The saddle is rough shaped to fit into the saddle slot snugly. The radius of the fretboard (14″) is sanded onto the saddle top on the belt sander. The saddle is then gently rounded over with a piece 120 grit sandpaper so that the peak of the saddle is directly down the center of its width. The best way to do this is to mark up the top of the saddle with pencil and sand each edge until just a thin ~1/64″ line runs down the middle of the saddle’s width.

With the nut and saddle in place, Chris installs the high and low E strings. He sets the overall string spacing by holding the E strings at a distance from the fretboard edge that looks appropriate to his eye. He then marks the outsides of the strings.

IMG_20150531_151157

Jim has set his overall string spacing and filed small starter notches to hold the E strings in place. He then used the StewMac string spacing ruler to determine the location of the other 4 strings. The marks are not spaced out equidistant from each other. The marks are further apart on the bass side to compensate for the thickness of the strings.

IMG_20150531_153841

The next step is to determine the height of the fret tops. Holding a straightedge across 2 frets, fit thin feeler gauges between the fretboard and the straightedge until the straightedge rests right on top of the feeler gauges. Add 0.006″ – 0.008″ to the stack of feeler gauges for either low or high action. Now this stack of feeler gauges can serve as a depth stop when slotting the nut.

IMG_20150725_150116

Jim demonstrates the proper angle to use when slotting the nut. The idea is that you want each slot to ramp up to the leading edge of the nut. This way the strings vibrating length will begin precisely where the intended start of the scale length is.

IMG_20150531_161601

Once the nut is slotted the guitar can be tuned up to pitch slowly. Jim and Chris have a completed instrument at this point! They spend an hour or so making adjustments to the truss rod, the nut and saddle to optimize its playability. Hard edges of the body are rounded over and the fretboard is cleaned up and oiled.

IMG_20150531_195111

IMG_20150531_195219

Was this useful? I would love to hear your questions or comments! I try to answer every e-mail I receive, so please be patient with me :) eric@ericschaeferguitars.com


Want more of this? Subscribe below for Weekly Guitar Making Tips on “The Small Shop Luthier Blog”


Want to learn more? Take a class with Eric Schaefer and build your own guitar in 8 days

ES BACKGROUND

Acoustic Guitar Design: Fretboard Woods

In part I of “Acoustic Guitar Design: An Insight into the Choices Made by Luthiers” I discussed body dimensions, scale length, string spacing, fretboard radius, neck profiles, fretwire size, wood selection and bracing. It was a very superficial glimpse into a number of complex topics. So much so that it is worthy of this disclaimer:

*Disclaimer: This is in no way a comprehensive overview of the considerations that go into designing an acoustic guitar. Not even close! Each topic presented here deserves a book of its own. The thoughts expressed here are intended only to scratch the surface of understanding and hopefully provide a jumping off point for further exploration into that specific topic.

I’ve since decided to go a little deeper with the followup articles to “Acoustic Guitar Design: An Insight into the Choices Made by Luthiers” and present a single topic per article so that I can give each topic its due consideration. The above disclaimer, however, still applies!

Fretboard Woods

Ebony

The ideal fretboard material needs to be hard, stable, close grained and smooth to the touch. Dark colored woods are also very much preferred over light colored woods by consumers and builders alike. There are two reasons for this:

  1. Light colored woods can develop a dirty smudged appearance over time from the oils on the player’s hands.
  2. Tradition: A jet black fingerboard is simply what we expect to see on a stringed instrument.

This is why jet black African and Indian Ebony has long been the wood of choice for fretboards. The bad news is that the situation with Ebony in the global marketplace is not good. Bob Taylor of Taylor Guitars spoke very elegantly on the topic some years back:

The gray to light brown streaks commonly found in Ebony follow the annual growth rings of the tree. For this reason flat-sawn Ebony is more likely to be jet black than boards cut on the quarter, which show the streaks following the grain. This is a situation of compromise for some. While quarter sawn boards are ideal for stability, they are also more likely to have these aesthetic “imperfections.”

I, for one, think the streaking is beautiful and gives every instrument unique character. Furthermore, very light streaking darkens to jet black, or nearly so, over time.

2015-11-05 11.25.25
Ebony fretboards on the left: Notice the prominent light streaking on the one board and the nearly jet black consistency of the second board. Rosewood (on the right) by comparison is much more varied in its color and composition, sometimes even approaching the look of jet black Ebony.


Rosewood

Rosewood is the most commonly used fretboard material found on guitars today.

There are many varieties of Rosewood (Cocobolo, Indian, Madagascar, Amazon, Palisander, Brazilian) and there are often striking aesthetic differences between the species. Even within a given species, there is often noticeable variety in color and composition from tree to tree. Again, this is a good thing. This is what makes working with wood exciting!

IMG_20150724_121252
Fret position markers are easy to inlay on this rosewood fretboard. Any gaps from the inlay process can be made invisible with a little Ebony dust and superglue.


Tip: Some builders seeking the jet black Ebony look will “Ebonize” an already dark piece of Rosewood. This means that they use dyes to color the light banding in the grain pattern to match the darkest bands.

Maple

Maple is more commonly seen on electric guitars. Like Ebony, Maple is hard and stable enough to be used flatsawn or quartersawn. Unlike Ebony, Maple is very light in color. Maple with flamed or a “birdseye” figure is especially prized.

IMG_20151105_144720[1]

The major downside of using Maple as a fretboard material is the need for a finish over the raw wood. This gives the fretboard a “slippery” feel, which is often undesirable, although some player’s prefer it.

Alternatives

Ebony, Rosewood and, to a much lesser degree, Maple have been the big 3 for fretboard wood, but all that is changing rapidly. Just some of many excellent alternatives:

  • Katalox
  • Bloodwood
  • Persimmon (in the same genus as Ebony)
  • Granadillo
  • Macacauba
  • Machiche
  • Ovangkol
  • Padauk
  • Pau Ferro
  • Wenge
  • Ziricote
  • Kempas
  • Bubinga
  • Goncalo Alves
  • Canary
  • Bocote
  • Purpleheart

All of these woods possess, in varying degrees, the characteristics that made Ebony and Rosewood a fretboard material mainstay for decades: Hardness, stability, closed pores and a smooth feel. And they have been right under our noses all along!

The exciting part is working with alternative species with a variety of colors, even bright reds (Bloodwood) and purples (Purpleheart). They also possess a varied sound profile, workability, texture, consistentency, and grain structure. Many of these woods I have yet to personally experiment with, but have heard them recommended by others. Personally, I view the alternatives as opportunities rather than challenges.

In my opinion, the situation with Ebony and other dark woods presents more opportunities than limitations. It is an exciting time to be a guitar maker, or any woodworker for that matter, as fashions rapidly change and our eyes are opened to just how set in our ways we’ve become with “traditional” wood choices, and how much variety there truly is out there!

If the situation suddenly reversed tomorrow and Ebony became cheap, abundant and sustainable, I would hope that the fashion of seeking alternatives, not for ethical reasons but for the sake of originality and art, would continue unabated.


Was this useful? I would love to hear your questions or comments! I try to answer every e-mail I receive, so please be patient with me :) eric@ericschaeferguitars.com


Want more of this? Subscribe below for Weekly Guitar Making Tips on “The Small Shop Luthier Blog”


Want to learn more? Take a class with Eric Schaefer and build your own guitar in 8 days

ES BACKGROUND


Clamps: How many is too many?


Spoiler alert. The correct answer is… You can never have too many!

This is no longer a statement of opinion, but rather a statement of fact, as evidenced by this trucker hat:

you_can_never_have_too_many_clamps_trucker_hat
If a trucker hat says it, it must be true!


It is safe to say that the question of “how many clamps” is not a point of contention in the woodworking community.

I teach Lutherie courses and I post pictures of my student’s acoustic guitar builds on facebook every day. It never fails that every time I post pictures of students gluing the top or back plate to the sides, somebody comments, “You can never have too many clamps!”

Its like a rallying cry for a common ideal that holds us all together as craftsmen, and I couldn’t agree more! 

IMG_20151022_181919[1]
Students gluing the top and back plates to the sides
The real question, then, is what clamps should we use and why? Because, while you cannot have too many clamps, you can have the wrong type of clamps for the job.

In the following paragraphs I will discuss the various clamps that I use as a guitar maker and the pros and cons of different choices. While my experience is within guitar making, I believe that the concepts discussed here will give the woodworker of outside disciplines an alternate perspective on the subject. Hopefully, there is something here for everybody…

I will discuss:

  • Wooden Cam Clamps
  • C-clamps
  • Spring Clamps
  • Spool Clamps
  • “Ibex” Bridge Clamps
  • Interior Mold Clamps

And some other options that we don’t call “clamps” but can achieve the same ends:

  • Rubber Bands
  • Go-Bars
  • Weight

Wooden Cam Clamps

Wooden cam clamps are the backbone of a luthier’s clamp supply, and they’re somewhat of a best kept secret.

It always amazes me how many woodworkers outside of lutherie have never used or even heard of cam clamps. Yet, for many general woodworking applications, they are as good as or better than other clamp types.

They are lightweight, quick and easy to use, have a secure grip and a high clamping pressure, though not as high as other clamps. You can easily vary the pressure and they are wooden with cork-lined jaws, so there is very little risk of marring your work-piece, unless you ding it with the metal bar.


1445557967573[1]

Cam clamps give somewhere in the ballpark of 400 lbs of clamping pressure at their maximum leverage point depending on the strength of the user and how the clamp was constructed. Due to the “camming” action of this type of clamp there is a slight force vector in the direction of the metal bar. In other words, cam clamps apply pressure both straight down and at a slight angle. This can be a disadvantage when trying to glue 2 large, flat surfaces together, such as gluing the headplate to the headstock. Glue acts as a lubricant to the surfaces and the clamp pulls the headplate off its mark. This effect is less pronounced and often inconsequential on smaller pieces such as the braces.


Student Jim Boettger glues the headplate with cam clamps despite their inherent problems. He mitigates the problem by using a C-clamp to “set” the headplate first.

This same pulling effect can be used as an advantage in certain situations. The bridge plate is a large, flat surface that tends to “swim” off its mark when glue is applied. Using cam clamps to pull the bridge plate against the arms of the x-brace is an effective clamping strategy.

IMG_20150523_121329
Student Chris Pulli gluing the bridge plate

Make Your Own Cam Clamps

I had the privilege of meeting Frank Finnochio, a well-respected luthier out of Easton, Pennsylvania,  when I was just starting out. It was a short visit but I asked about cam clamps and he recommended cam clamps with aluminum bars rather than steel. Aluminum is far lighter than steel and still strong enough, since the pressure is being applied against the narrow face of the bar and across the width. The aluminum clamps are less back-heavy.

I asked him where he purchased his cam clamps with the aluminum bar stock. He told me he purchased all the clamps he needed 20+ years ago and the man he purchased them from was 80 years old at the time. I took down the man’s name but I wasn’t surprised when a google search for his clamps didn’t yield any relevant results.

So rather than buying commercially available cam clamps with steel bar stock, I began making my own clamps with aluminum bar stock.

The difference is subtle and I still regularly use the StewMac cam clamps that I own, but the lightweight aluminum clamps that I made I find to be ideal for certain delicate operations, like brace work.

Cam clamps are easy to make for you DIY’ers. I will post a how-to on making cam clamps in a future article.

I took inventory on my clamps and I have a whopping 68 wooden cam clamps! Don’t let this discourage you, though. If you are just getting starting out you only need a handful of clamps to get by. Make or buy just 6 and have a variety of short and long clamps.


IMG_20151022_183123[1]

Tip: Use the long cam clamps as a set of hands for routing off of small templates on the router table.

IMG_20151027_132338
C-clamps

I took a peek at Bessey’s website and they have heavy-duty C-clamps for metalworking and heavy construction that are capable of producing as much as 40,000 lbs of clamp force! Yikes! Thats more clamp force than I usually need by a factor of 100!

Light duty, general use C-clamps are the kind available in hardware stores and they provide more than enough clamp force for guitar work and really any woodworking purposes…way more than enough! With up to somewhere in the ballpark of 1800 lbs of clamp force from the larger light-duty clamps!

C-clamps come in a variety of sizes. These are the sizes I find useful in my shop, but if you’re just getting started 4″, 1.5″, and deep reach clamps are all you need; I’d recommend 2 of each.

1445567988441[1]

I included the bar clamp in the picture above simply to illustrate the significant difference in maximum clamp force between bar clamps and C-clamps. This is due to the mechanical advantage of the pin at the end of the threaded screw portion of the clamp.

Note: Keep in mind that all these clamps have variable clamping pressure, so just because a clamp CAN crush your work into smithereens, it doesn’t mean that it will!

The pros of C-clamps:

-The clamp force is directed straight down along the vertical axis of the clamp so it doesn’t “pull” your work-piece off of its mark. This is important for “setting” the inital tack of a glue-joint. As mentioned previously, this can be a big deal when you are dealing with large, flat surfaces.

-The extra clamping force is beneficial for holding a work-piece to the bench during hand-sawing operations, where cam clamps sometimes don’t hold up to the side-to-side vibrations.

– The bearing surface at the end of the threaded screw part of the clamp has some free wiggle in all directions. This allows for secure clamping between surfaces with slightly angled planes as seen below.

IMG_20151023_135150[1]

The cons of C-clamps:

  • They’re heavy.
  • They are not quick to use. Dry runs are always a good idea, but they are even more important when using C-clamps because of the significant time it takes to turn the threaded screw. I can’t tell you how many times I’ve skipped the dry run only to find that all my C-clamps are threaded out all the way to the end.
  • The pin at the end of the threaded screw crowds out other clamps in tight situations such as the one below. This problem can be mitigated, however, by alternating which side the pin is on and/or by using a variety of clamp sizes so that the pins aren’t all at the same height.IMG_20150613_120854
  • The clamp force is concentrated between two small metal points. Not ideal for holding or gluing wood surfaces. For this reason, C-clamps require padded cauls in order to more evenly distribute pressure and to protect the surfaces. Notice the caul in the picture above

Spring clamps

Spring clamps are lightweight, low-cost, and even easier to use than cam clamps. Just squeeze the trigger and release. The trade-off is in strength. Spring clamps are only as strong as their spring.

IMG_20151023_161355[1]

They are great for any situation where you simply need an extra hand. The relatively light hold is enough for aligning and marking out dimensions.

They are appropriate, however, for some gluing operations, particularly delicate ones where the weight of the clamps are a paramount concern.

IMG_20150720_094212
Student David Shelly uses spring clamps to glue the side braces to the ribs of his guitar.

Tip: For cheap and easy DIY miniature spring clamps like the one on the left side of the picture, buy a pack of regular clothespins and wrap a rubber band around the jaws of each clothespin


IMG_20151023_164524[1]

These “clothespin spring clamps” can be used to glue the kerfing to the sides.

IMG_20150719_171318
Student David Shelly glues the kerfing to the sides

Spool Clamps

Spool clamps are another luthier designed tool. The spool clamp you see below consists of nothing more than a cork-lined wooden plug or dowel with a lag bolt passing through it. A wing nut and a flat washer are threaded onto the other end to make up the lower bearing surface.

IMG_20151026_122224[1]

Spool clamps work perfectly with the “solera” method of guitar assembly. They are much cheaper and easier to make than wooden cam clamps.

IMG_20151026_123820[1]
The “solera” workboard for acoustic guitar assembly
“Ibex” Bridge Clamps

“Ibex” bridge clamps, yet another luthier-specific clamp, were originally designed by Irving Sloane.

IMG_20151023_172536[1]

They are lightweight, and are sized to reach the bridge from inside of the soundhole on almost any guitar, even guitars with 12 frets to the body. Most importantly they have more clamp force than a wooden cam clamp, which is very desirable for this all too important glue joint.

IMG_20151020_085720[1]
Student Sam Young’s guitar clamped using Ibex Bridge Clamps on the wings.
Interior Mold Clamps

IMG_20150618_000040

Interior mold clamps are made from a regular hardware store turnbuckle and blocks of wood shaped to bear against the upper bout region and the lower bout region of the inside of the sides. When you turn the turnbuckle, both ends extend and pressure is increased outward. This holds the sides tight against the form and maintains their square during glue up of the back plate.

The interior mold clamps are also critical for preventing cracking of the sides while radius sanding the sides and kerfing as seen below.

IMG_20150617_163630
Student Aaron Cromie prepares to radius sand the kerfing.

You may notice that the clamp for the waist region of the guitar is different than the two for the upper and lower bout.

The waist clamp is simply 2 pieces of plywood cut to appropriate length and with the ends shaped to match the curves of the waist. A bolt is threaded through both plywood pieces and a wing nut threaded onto the end. The clamp works by pinching the waist.

IMG_20151026_171955[1]
The waist clamp
Rubber Bands

IMG_20151027_114438[1]

Heavy duty rubber bands, such as the kind bought from Woodcraft stores, are great for clamping awkward shapes that other clamps would simply slide off of.

Some luthiers use these to clamp the top and back plates to the sides. They build a workboard with small L-hooks screwed in around the outline of the guitars shape. The rubber bands grasp the L-hooks on either side.

Of course, using the appropriate strength rubber band is important here.

Go Bars

IMG_20151027_115832[1]

Go-bars are simply flexible rods. The white rods on the left side of the above picture are commercial fiberglass go-bars. To the right of that is a bundle of homemade wooden go-bars, which are simply thin strips of oak. The large gazebo-like apparatus that surrounds the go-bars in the picture above is called a go-bar deck.

Go-bars work by compression, as seen in the picture below.

IMG_20151027_153903[1]

The benefit of go-bars is that they don’t compete for space like other types of clamps do, and finding a clamp with a throat deep enough to reach to the center of a large piece is not an issue with a go-bar system.

Luthiers use the go-bar advantage when gluing the complex and delicate bracing of the top and back. Using this system, a luthier can glue all the braces at once because the “clamps” don’t compete for space and they can reach out to the middle of the work-piece to clamp, say, the bridge plate or the intersection of the x-brace.

Keep in mind that having a go-bar deck and go-bars is not a necessity for stringed instrument making. This system simply makes gluing the braces quicker and easier, but if you don’t have this kind of setup there are many other ways to glue your braces. You just may have to glue them in steps rather than all at once.

IMG_20150614_162944
Gluing braces with cam clamps and cauls to distribute pressure across braces.

Weight

Last but not least, sometimes the solution to your clamping dilemma is simpler than you may initially think.

I keep severally hefty objects of various weight and size around the shop for situations that call for very low clamping force and a wide distribution of pressure.

2015-10-24 19.56.51-1

I use weights, for example, to keep the centerseam of the backs and tops from buckling under pressure during the joining process.


Well there you have it! Now you have an excuse to buy even more clamps that you didn’t know you needed!

Was this useful? I would love to hear your questions or comments! I try to answer every e-mail I receive, so please be patient with me :) eric@ericschaeferguitars.com

Want more of this? Subscribe below for Weekly Guitar Making Tips on “The Small Shop Luthier Blog”


Want to learn more? Take a class with Eric Schaefer and build your own guitar in 8 days

ES BACKGROUND


Acoustic Guitar Design: An Insight into the Choices made by Luthiers

This article is intended as a basic primer into some of the acoustic, structural and aesthetic choices one must make when constructing a steel string acoustic guitar. The following includes notes on body dimensions, scale length, string spacing, fretboard radius, neck profiles, fretwire size, wood selection and bracing.

Guitar players and woodworkers, amateur and professional alike, will hopefully gain some insight from this. So enjoy!

Body Dimensions

Volume, tone, and to some degree, playability are all factors for consideration when determining the overall body dimensions for a guitar. There are many dimensions to look at (upper bout, lower bout, waist, body depth, overall length etc.) but the width at the lower bout is a good starting point for establishing your tone, volume and playability based on what style of music you intend on playing.

Lower bout widths range from about 14″ to 17″, ignoring extreme cases.

Guitars in the 14″ and 15″ range :

These are your Grand Concert, Auditorium, OM, and 000 models. They tend to be bright in the 14″ range and more focused and balanced from bass to treble in the 15″ range. Without the boom of larger, more bass heavy models, which often creates feedback in live or recording situations, guitars in the 14″ and 15″ range are often preferred by recording artists.

Folk artists and singer-songwriters enjoy the tamed bass response and lower volume necessary for singing along in the 14″ range.

Solo instrumental styles, such as the increasingly popular percussive fingerstyle genre, expect a balanced guitar from bass to treble such as Auditorium and OM sized models in the 15″ range.

Student Aaron Cromie uses a mold for his guitar body. Similar to an OM, the lower bout is 15.25″, the upper bout is 11.5″, and the waist is 9.5″.


Guitars in the 16″ and 17″ range:

The ever popular Dreadnought models are in the 16″ range. They have a heavy bass response and are preferred by bluegrass flatpickers who desire the ability to play with a heavy attack without distorting the sound.

Furthermore, bluegrass flatpickers are often competing for stage presence in un-miked situations with fiddles, mandolins and other acoustic instruments. The larger volume of the larger body cavity helps them to cut through all the sound.

Then there are Jumbos. These behemoths have lower bout widths close to or exceeding 17″. They are known for their bass heavy, powerful tone, often heard in acoustic blues music. Personally, I was never a Jumbo player or builder myself, so I won’t say anything else about these monsters of the guitar world.

Scale Length

Scale length is better understood as the speaking length of the string. This is the distance from the leading edge of the nut to the saddle.

All you have to remember is:

The shorter the scale length; the lower the tension

To better understand this, try this experiment with your guitar:

Tune your guitar to standard tuning (EADGBe). Now place a capo at the first fret. You have just effectively shortened the scale length. What happens to the pitch? Every string goes up a half step (F,A#,D#,G#,C,F). In order to play the guitar at standard tuning again with the shortened scale length you must tune down, thus decreasing the tension on the strings.

So what are the pros and cons?

Short scale/decreased tension

Lower tension allows for easier bends. This is, of course, highly desirable for blues musicians.

However, if your playing style does not use a lot of bends, especially whole note bends, then playing a short scale/decreased tension guitar can be frustrating, as fretted strings can bend just slightly out of tune accidentally.

Long scale/increased tension

Higher tension produces a brighter, more focused tone with more projection and clarity.

The increased tension can be harder on the hands and make fretting more difficult for the novice, but as mentioned above, the novice will have an easier time keeping fretted notes in tune.

IMG_20150617_122635
Student Ariel Borohov uses a template to slot his fretboard for a scale length of 25.34″

String Spacing

The string spacing is set at the nut. A good luthier will take the thickness of the strings into account when measuring out the spacing. If, for example, the strings were marked out equidistant to each other from their centers, then you would have more crowded strings on the bass end due to the larger diameter of the bass strings. This situation is not desirable to most players.

Student David Shelly sets the string spacing at the nut to compensate for the thickness of the strings.

String spacing at the nut is not the same as the string spacing at the saddle. This is because most fretboards are tapered; wider at the soundhole and narrower at the nut. The string spacing at the nut, width of the fretboard at the nut, and the taper of the fretboard are all considerations based on player preference.

Fretboard Radius

Classical guitars generally have flat or nearly flat fretboards.

Steel string guitars generally have radiused fretboards ranging from 7.25″ to 20″. This is a response to the increased tension of steel strings. The curvature of the board allows for easier barring of chords. How much or how little curvature is simply a matter of preference and the only way to find out what you like is to experiment at both extremes.

All you have to remember here is:

Smaller radius = more curvature

larger radius = flatter

IMG_20150829_162741 - Copy
Student Jake Hoffman sands a 14″ radius into his fretboard.

Neck Profile

The feel of a stringed instrument can be drastically altered by decisions made at this stage of the build.

I hand carve the neck of each and every single guitar I make without templates of any sort, so that every guitar neck has a truly unique profile, depth, width and taper.

That is why it pains me to write such a gross oversimplification of the neck, but for the sake of brevity I think it is necessary.

For this reason I will present 3 common neck profiles for the reader to consider:

The C

The C neck has a smooth, continuously consistent curvature when viewed in cross-section. This typically fits better into smaller hands.

The D

The D neck is thicker in cross section with the curvature beginning further out from the fretboard. This typically fits best into larger hands.

The V

The V is just that: 2 flat edges coming to a point right where the player’s palm meets the neck. This is less common than the other two styles.

Many guitar necks fall somewhere in-between the C, D and V and can be described as a “medium D” or a “soft V” or a “[insert adjective] C”

You get the point.

Usually the best neck profile for a player lies somewhere in-between. For example, some players wouldn’t like a V neck for its hard edges but would like a “soft” V.

IMG_20150530_161021
Student Jim Boettger hand carving his neck. He uses a spokeshave to set the contour.

Fretwire

Fretwire comes in medium, wide, narrow, jumbo, small, tall and in combinations such as “medium wide.” The terms are all kind of subjective as they vary from manufacturer to manufacturer.

There are just a few important things to note here:

Taller frets allow the player’s fingers to have less contact with the wood of the fretboard, thus reducing friction. This may be important if fast licks are your thing.

Also, tall fretwire is good for the longevity of the instrument. You know those pits and grooves that develop in your frets after years or sometimes just months of playing? Well, taller frets means you can have more fret levels before a refret is necessary.

The downside of tall frets is that your notes can bend slightly out of tune if you press very hard.

The truth is that notes can bend slightly out of tune on any fretted instrument if you press too hard but the degree of out-of-tuneness (Yes, I said out-of-tuneness) is notably higher on taller frets.

IMG_20150526_152927
Student Chris Pulli hammering “medium” fretwire into his fret slots. The width is .084″ and the height of the crown is .039″.

Neck Wood

The neck accepts a considerable amount of tension. The scale length, the string gauge and the pitch of each open string all factor into the overall tension on the system. The amount of tension can vary considerably from instrument to instrument but for the sake of this explanation let’s just ballpark it at 200 lbs.

With 200 lbs +/- of resting tension, the chosen wood for the neck must be strong. If strength were the only consideration then the decision would be simple: Maple or Oak.

However, strength-to-weight ratio is really what we as luthiers are seeking; High strength with low weight.  This disqualifies Oak for its heaviness. Maple, while still used on some guitars, especially electrics, is good but not ideal.

While there are many suitable options, the wood of choice for most builders is Honduran or African mahogany. Not only does this wood have a great strength to weight ratio; it also holds up well to environmental changes, as anyone who has ever turned a truss rod knows is another important consideration.

This does not mean that there are not many other great options available for neck woods. Mahogany is simply the most common. There is Cherry, Walnut, Maple, Rosewood, Sapele and too many others to list.

IMG_20151013_195401[1]
Student Sam Young’s neck, made of Honduran Mahogany, in an early stage of construction.

Soundboard Wood

Consider this analogy: If the body of a guitar is a speaker box, then the back and sides are the cabinet and the soundboard (top) is the speaker cone.

If the soundboard is like the speaker cone then it reasons to think that the soundboard should be constructed in a way and with such a material as to be lightweight, flexible and resonant.

Spruce, especially Sitka Spruce, is by far the most common choice amongst builders. Redwood, Cedar, Douglas fir, Aspen and other softwoods make up a much smaller percentage of the guitars in the world today, probably less than 5% (Someone please challenge me on that number. It is just an educated guess).

IMG_20150525_110317
Sitka spruce: A common choice for the “speaker cone” of the guitar.

Back and Sides Wood

The wood for the back and sides traditionally comes from the same source as a “set.”

This means that the wood supplier or the luthier will use matching plates of wood from the same section of the same tree. Therefore, the grain pattern should be relatively consistent between the “bookmatched” pairs of the back and the sides. This results in an instrument that is acoustically, structurally and aesthetically symmetrical.

An important consideration for the side wood is how well it holds up to bending by heat. Depending on the species, the wood needs to be thicknessed down to 0.085″ +/-, soaked or sprayed with hot water, and then very slowly, and carefully bent with competent hands on a hot pipe or placed in a specialty bending jig. The easiest wood I have found to bend is Cherry, and I would recommend that to a first-time bender.

The hardest woods to bend are those that are highly figured.

IMG_20150525_110304
A variety of choices for the back and sides.

Bracing

The subject of bracing is way too involved to cover in a few paragraphs. It really deserves its own book. However, I will try to summarize some of the ideas behind bracing using the most popular steel string bracing pattern as an example: X-Bracing. We will break things down into structural and acoustic considerations.

Structural Considerations

The soundboard and the back were thinned out so as to be more responsive. However, They still have to hold up to a huge amount of tension. Remember that 200 lbs of string tension on the neck? Well that tension is more or less being split between the neck and the bridge. Imagine the whole guitar wanting to fold upon itself like a taco! The first thing the bridge has to do is spread that tension out to the sides to keep itself from ripping off the soundboard. The bridge achieves this through a system of trusses or “braces” whose primary goal is spreading this load out to the sides. This is the job of the X- Braces.

At the same time as the bridge wants to rip off the soundboard, the tension on the neck creates a torqueing effect on the fretboard tongue, which places some of the tension dealt out to the neck squarely onto the upper bout region of the soundboard. The Upper Transverse Bar and the Fretboard Graft spread out this load.

The Soundhole Braces connect the Upper Transverse Bar and the X-Braces so that the load from the fretboard tongue and the load from the bridge are connected to the bracing system as a whole. The Soundhole Braces also serve to strengthen the soundhole area because, well, there’s a giant hole there!

Another goal of the bracing system is to keep splits in the soundboard, sides, or back from spreading, if they happen. That is why braces always run either perpendicular to the grain or at an angle to the grain. Also notice that there are no large open areas without cross-grain bracing.

Acoustic Considerations

The X-braces carry not just the tension out to the sides, but also the sound. Every time a string is plucked, the sound travels through the dense material of the saddle, the hardwood bridge and the hardwood bridge plate to the softwood of the X-brace, where the tone spreads out to the rim, the finger braces and the aptly named Tone Bars. The entire soundboard is activated.

IMG_20150413_160439[1]
Student Phil Dean’s Soundboard and back bracing. Notice the simplicity of the back bracing in comparison to the soundboard bracing.
That’s it for now! Stay tuned for a part two. I plan on covering many more aspects of acoustic guitar design…

Was this useful? I would love to hear your questions or comments! I try to answer every e-mail I receive, so please be patient with me :) eric@ericschaeferguitars.com

Want more of this? Subscribe below for Weekly Guitar Making Tips on “The Small Shop Luthier Blog”


Want to learn more? Take a class with Eric Schaefer and build your own guitar in 8 days

ES BACKGROUND


Install a “Workbench Light-box”

Functionally, A lightbox is nothing more than a translucent, backlit work surface. Ordinarily this takes the form of a wooden box which houses a light source and has one face of clear Plexiglas or acrylic. This box can be pulled out when needed and stowed away for later use.

Installing a backlight directly into your regular worksurface, however, has the advantage of always being within arm’s reach, therefore promoting more consistent use and more diligent work habits; All the while, taking up less space.

IMG_20150922_163722[1]

As a luthier, I primarily use the lightbox for preparing the bookmatched pairs of the top and back plates for jointing and joining. The Plexiglas provides a flat surface for resting the plates and the backlight reveals poor mating of the centerseam, as seen in the picture below.

IMG_20150922_163634[1]

A more general function of the lightbox is to check any surface for true against a straightedge. This, of course, is useful to woodworkers and craftsmen of all types.

Last but not least, the lightbox does triple-duty as a “tracing box.” In this case, the backlight provides high contrast for designs to be traced out on tracing paper. In the picture below, I am tracing out an inlay design onto a peghead design.

IMG_20150927_220123[1]

Construction

First I traced the outline of my Plexiglas sheet (28″ X 28″) onto the work surface.

IMG_20150921_103303[1]


Then I inspected the joists below.

The workbench I used for this project is not a heavy duty, solid wood workbench typical of a woodworkers shop. This is more of a DIY projecter’s workbench with a plywood surface and 2 X 4 joists for support.

I removed the center joist in the picture below. This joist would only get in the way. The other two joists in the picture I re-located so that they were about 2 or 3 inches inside of the outline that I traced onto the work surface.

IMG_20150928_115803[1]

With a 1/2″ bit, I set my plunge router to the depth of the Plexiglas sheet.

I set a long sheet of plywood to act as a fence to guide the router. I adjusted the fence until it was set so that the cutting bit would run along the traced line. Then I clamped the fence in place and cut.

I repeated this for the other 3 sides of the square outline until my tabletop looked like this:

IMG_20150921_113709[1]

I continued routing out the recess to about 3″ inside of the outline. However, I should have cleared as much material inside the outline as the base of my router would allow, before moving on to the next step. As you’ll see in the following pictures, the extra material leftover is a little bit more difficult to remove after the opening is cut.


IMG_20150921_120600[1]

I drilled a hole large enough for my jig saw blade and cut as close to the 2×4 joists as I could.

This was the point where I wished that I had recessed more material with the router first. It wasn’t a huge deal, though. I just had to be careful and mindful of what the base of the router was being supported on while clearing the rest of the recess.

After the recess was cleared, I installed a straight cut bit with guide bearing into my router (in this case my laminate trim router) and set the depth so that the guide bearing would run against the 2×4 joists.


IMG_20150921_133444[1]

Using the guide bearing bit, I brought the opening in flush with the 2×4 joists.

IMG_20150921_135738[1]

I rounded the edges of my Plexiglas sheet and checked for fit. Perfect!

IMG_20150921_140229[1]

I installed a 2′ long LED light source, directly below the Plexiglas sheet and secured the Plexiglas in place with screws. The screwheads were recessed into the Plexiglas.

IMG_20150922_163600[1]

I drilled a hole through the front facing joist so I could run the wires to a switch.


IMG_20150922_164128[1]

The final result: A more efficient way to joint a large batch of bookmatched pairs and a less cluttered workspace! See Jointing and Joining the Plates for more info on how this is done.

IMG_20150923_130732[1]

Was this useful? I would love to hear your questions or comments! I try to answer every e-mail I receive, so please be patient with me :)  eric@ericschaeferguitars.com

Want more of this? Subscribe below for Weekly Guitar Making Tips on “The Small Shop Luthier Blog”


Want to learn more? Take a class with Eric Schaefer and build your own guitar in 8 days

ES BACKGROUND